The complexity of electronic-device testing varies widely, ranging from the simplest type—manual testing—to the most complex—large-scale automatic test equipment (ATE). Manual testing typically requires DVMs, oscilloscopes, and other equipment set up in a particular configuration. When the device type to be tested changes, you usually need to change the test hardware. ATE testers, on the other hand, provide tremendous flexibility, allowing many different types of devices to be tested without changes to the test hardware. Software changes reconfigure this type of tester to accommodate different types of devices. In addition to the versatility that this equipment provides, it enables electronic testing of great complexity, although at a price: These testers can cost upwards of a million dollars.
In between simple manual testing and large-scale ATE lies the low-budget and medium-scale testing that is the focus of this article. These types of test systems are usually dedicated to testing a specific component or circuit, under the control of a personal computer. Compared to large-scale ATE, they lack in flexibility and test complexity. However, the price paid for this equipment usually justifies its use; it is dramatically cheaper than large-scale testers. See Figure 1.
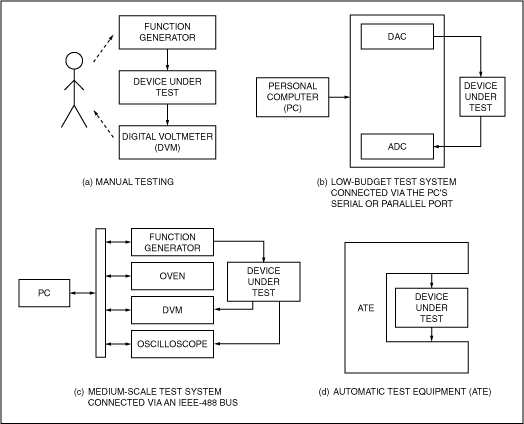
Figure 1. Test systems range in complexity from (a) labor-intensive manual testing to (d) fully automatic test equipment. This article focuses on low-budget and medium-scale test systems (b and c).
This article discusses various topics that apply to low-budget and medium-scale testing, including the different interfaces used to connect PCs to test equipment, as well as hardware and software design.
Connecting a PC to Test Equipment The PC Parallel PortOne of the easiest ways to connect test equipment and the device under test (DUT) to a personal computer is through the use of the PC's parallel port. This port is standard equipment on nearly every IBM- compatible PC. The standard parallel port provides 12 logic outputs and five inputs, which can be connected directly to TTL / CMOS circuits. You can also use an enhanced version of the parallel port found on many modern computers. Software design is simple: The PC parallel port is easy to program using C or Basic. For programming details, refer to Parallel Port Complete by Jan Axelson.
Because PCs contain the hardware needed to operate the PC parallel port, there is no need to open the PC to install a card. Using the parallel port thereby eliminates the risk of ESD damage due to improper handling procedures while the computer is open.
Engineers connect the parallel port to various types of interfaces. The parallel port often drives 2-wire I²C interfaces. Because the I²C standard specifies that I²C transmitters provide logic signals via open-collector outputs, the interface circuitry can be as simple as a single 74HC05 open-collector inverter IC. Figure 2 illustrates a parallel-port-to-I²C interface that transmits and receives data to and from a DUT.
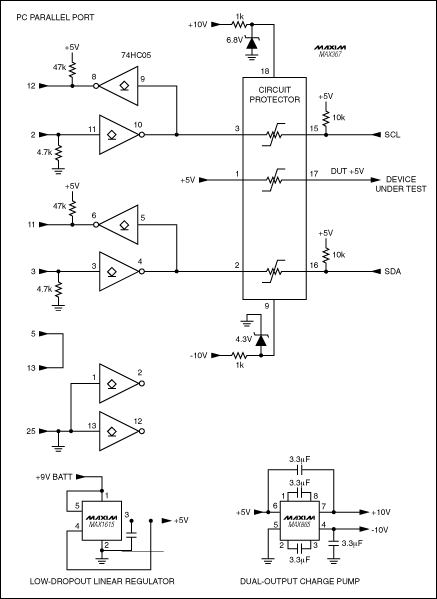
Figure 2. This parallel-port-to-I²C interface provides the open-collector connection to the I²C serial port mandated by the I²C specification. The MAX367 circuit-protector IC keeps voltages that exceed the supply rails from damaging the interface circuitry as well as the parallel port itself.
Along with the advantages of communicating via the PC parallel port, a number of minor pitfalls accompany its use. For example, when using programs written for Microsoft Windows, the number of unused parallel-port input pins you can dedicate to the application is reduced to four. This problem occurs because programs written for Microsoft Windows cannot reliably determine the address of the parallel port. Connecting one of the output pins of the parallel port to one of its input pins allows software to automatically determine the parallel-port address. Doing so , however, reduces the number of usable input pins to four. A more difficult problem can occur if voltages that exceed the supply rails come in contact with any of the circuitry connected to the parallel port; these voltages can destroy the circuitry external to the computer as well as the parallel port itself.
A way to guard against excessive voltage is to include a circuit protector chip. The MAX367 circuit-protector IC pictured in Figure 2 protects against such occurrences. (The circuit shown in this figure is available on an interface board from Maxim.) When voltage applied to either side of any protector within this IC exceeds the supply rails, the resistance of the specific protector becomes very high, preventing appreciable current from flowing through it. Also, the chip limits the voltage to within the supply rails, ensuring that any high voltages inadvertently placed on the SCL, SDA, or DUT + 5V pins are prevented from damaging the interface circuitry as well as the parallel port.
Other minor problems can crop up when using the PC parallel port. Because only a small amount of power can be drawn from the unused parallel-port output pins (no more than 10mA with the output voltage perhaps dropping as low as 3V), an external power supply may be needed. Yet a carefully designed micropower system can eliminate the need for this external supply. Another possible problem is that parallel-port logic levels can vary from one PC to the next. Because computer manufacturers use S, TTL, LSTTL, or CMOS output drivers within their computers, some drivers provide output levels close to 5V whereas others are nearer to 3V.
Low-budget test systems often share a computer that runs other applications, and this can lead to problems. For instance, when a computer includes a print driver, it may maintain control of the parallel port even when nothing is being printed. Because most PCs include only one parallel port, no communication with test equipment via the port is possible under these conditions. Another source of possible bus contention is software protection keys that plug into the parallel port.
Today's computers typically include enhancements that allow bidirectional communication via the parallel port. The relatively modern ECP and EPP standards allow the parallel port to automatically transfer blocks of data to and from the PC (that is, bidirectionally). Sometimes the system BIOS disables these enhancements , and sometimes computers that include these enhancements are incompatible with other computers.
When communication with the test system must be carried out with precise timing, the parallel port may not be the right choice. The periodic intervals when the main processor refreshes the PC's dynamic memory often cause the waveforms synthesized by the parallel port to be "jittery. "Even worse, when using Windows, the program driving the parallel port can be interrupted periodically. Although all programmed events occur in the correct order, the exact timing of these events is not assured.
The PC Serial Port (RS-232) The PC serial port (sometimes called the RS-232 port) provides another easy method for connecting a PC to a device under test. Like the parallel port, a serial port is available on most PCs; an interface card need not be installed. However, unlike the parallel port, which uses logic-level voltages, the serial port signals with voltages that swing both positively and negatively. The transmitter voltage levels required by the RS-232 specification are at minimum ± 5V. In reality, though, voltage levels can vary from ± 3V to ± 30V. The logic-level variations that occur when using a parallel port don't apply to a serial port, because after receiving the RS-232 signals an RS- 232 receiver provides a logic-level output close to the voltage of the supply powering the receiver (if the output is loaded lightly).
The serial port allows only one driver on each signal line, so it can connect the PC to just one device at a time. Some devices get past this restriction by using the hardware handshake lines to signal; however, this is an unorthodox technique whose description is beyond the scope of this article. Because PCs usually include only one or two serial ports and each instrument requires exclusive use of a port, a test system based on the serial port has limited expansion capability.
The serial port provides even less power than the parallel port, and the voltage levels are not regulated. As mentioned above, these voltages can range from 3V to 30V and the signal polarity can be positive or negative. With the aid of some additional circuitry, the serial port can power a micropower circuit, but most applications require an external power supply.
When you use a serial port, sending and receiving data often requires a microcontroller. Some microcontrollers, such as the 68HC11, the 8051, and the PIC16C63, include a UART. Teamed with a MAX3320 RS-232 transceiver and a low-cost ceramic resonator , these microcontrollers can receive commands from a user-interface program running on the PC. Two options for this user interface are possible: using a text-only terminal program (for example, Hyperterminal or Procomm) or a custom graphical interface.
After receiving these commands from the user interface, the microprocessors shown in Figure 3 can perform relatively sophisticated control functions without the aid of the PC.
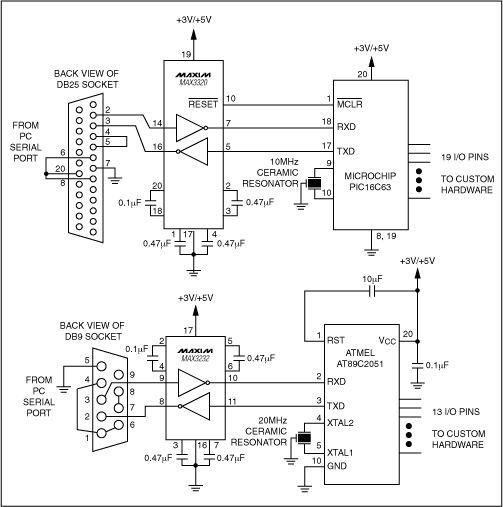
Figure 3. Having received commands from the PC via the serial bus, these microprocessors can perform relatively sophisticated control functions without the aid of the PC.
The IEEE-488 BusThe IEEE-488 bus is a more complex, but far more versatile, system. It is also called the GPIB or HPIB bus. Unlike the serial and parallel ports, this bus can connect directly to more than one instrument at a time. In the test system shown in Figure 4, a PC controls an oven, a pressure source, a voltmeter, and a pressure-sensor tester. Control via one bus common to these various instruments and devices under test is possible using an IEEE- 488 bus.
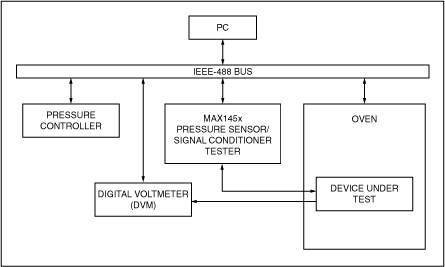
Figure 4. This test system permits automatic production testing and compensation of pressure sensors. The IEEE-488 bus facilitates communication between the PC and the components of the test system.
The IEEE-488 specification can allow multiple instruments to share the same bus, because the IEEE-488 bus uses a different output-driver structure than the serial and parallel ports discussed. Each IEEE-488 driver includes a strong pulldown resistor and a weak pullup , allowing one or more devices connected to the bus to pull each signal wire low (or to allow the line to remain high when none of the devices asserts a low).
Other advantages accompany the use of this bus. One such plus of the IEEE-488 interface is that it includes a hardware handshake that helps prevent data loss. Another significant advantage is its popularity among the major bench-top test equipment vendors (for example, HP / Agilent, Tektronix, Fluke, and Keithley). Because power supplies, relay switch banks, environmental chambers, oscilloscopes, digital voltmeters, function generators, and other equipment are available with IEEE-488 buses, you can automate virtually any bench-top test setup.
Software that controls this bus is available off the shelf or can be developed in-house. National Instrument's Labview and Agilent's (formerly Hewlett-Packard's) Agilent-VEE are two of the most popular software packages for controlling instruments via the IEEE-488 bus. Alternatively, control software can be developed using traditional "C" programming, given a certain level of expertise. However, use of the Labview or HP-VEE allows a novice programmer to design sophisticated programs quickly and easily. Labview and HP-VEE come with software modules for driving many common instruments.
A few problems are associated with the use of the IEEE-488 bus. Because the IEEE-488 bus is not standard equipment on most PCs, an interface adapter card must be added, and these cards cost $ 500 or more. These interface cards are available from companies such as National Instruments, IOTech, Measurement Computing, Agilent, and Tektronix. Added to the cost of this card is the cost of IEEE-488 cables, which are about $ 20 each. The IEEE-488 instruments themselves are expensive. Also, if your test system requires that you develop custom instruments, significant software and hardware development time will be necessary. A custom instrument requires a microprocessor and an IEEE-488 interface controller, both of which imply substantial development time.
Figure 5 depicts the MAX145X tester, a key portion of the pressure-sensor test system shown in Figure 4. This tester is a multiplexer / driver instrument developed by Maxim. Using an oven, a pressure controller, and the multiplexer / driver instrument, original equipment manufacturers (OEMs) that purchase the MAX1457, MAX1458, or MAX1459 pressure-sensor signal-conditioning chip can easily test and calibrate these ICs. This tester calibrates and tests these signal-conditioning chips when they are used in conjunction with pressure sensors. Because this system allows access to the Labview program that controls the IEEE-488 bus, the test system can be readily modified to meet the unique needs of a particular production line. Simple text commands sent to the tester communicate with the MAX1457-MAX1459 and apply the compensation algorithm that compensates the accompanying pressure sensors.
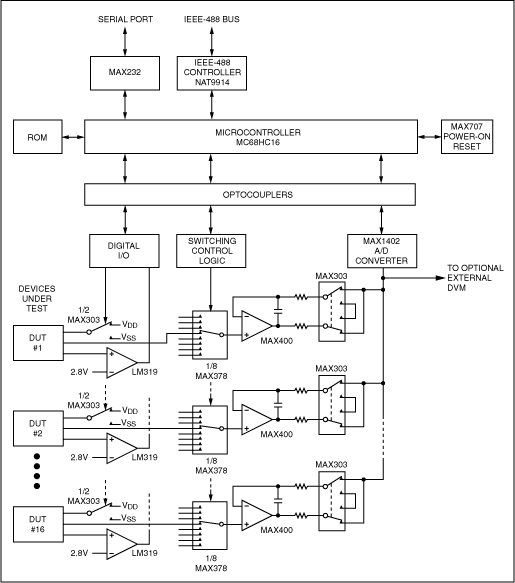
Figure 5. This simplified block diagram of the tester portion of the Figure 4 test system shows the custom hardware developed to test and compensated pressure sensors mated with MAX1457-MAX1459 signal-conditioning ICs.
Test-System Design Techniques Hardware DesignControlling test instruments using an IEEE-488 bus may require the time-consuming process of writing software that controls the interface. You can save software development time, however, by using a bus-controller IC such as National Instrument's NAT9914. Using a bus controller also frees the microprocessor from the time-consuming activity of monitoring the IEEE-488 bus.
When noise levels or measurement precision is critical, addressing these concerns from the beginning is important. Such performance problems become increasingly difficult to solve as the project progresses. In the tester pictured in Figure 5, two precautions were taken to achieve the desired measurement accuracy. First, the digital and analog grounds were kept separate. Second, high-speed optocouplers were used to isolate microprocessor-switching noise from the analog signals.
Another important precaution is to make sure to identify high-impedance nodes, such as those found at op-amp inputs. Because these nodes are sensitive to noise, keep them away from noisy signal lines. Noisy lines are those that carry fast rise- and fall-time signals, and they are often fed from digital or video sources.
Such high-speed signals may need to be routed through a transmission line, depending on the distance over which they travel. Use special controlled-impedance layout techniques to incorporate these transmission lines in the printed-circuit board. These lines require precisely calculated dimensions and are typically routed without vias.
When testing numerous devices simultaneously, make sure that one failed device doesn't prevent the testing of the remaining devices. This problem can occur when a device under test's power-supply lead is shorted to ground; this short can sufficiently load the power supply to prevent accurate testing of the remaining devices. Ballast resistors connected in series with the power-supply lead of each device under test keep this problem from occurring.
When gang-testing a large number of devices, it's best to use hardware that operates independently of software to identify and quickly disconnect any short-circuited DUTs, thus preventing further damage. The added delay that software can contribute could increase the damage incurred by excessive current. Also, if this excessive current loads the supply that powers the microprocessor, the actions ordered by the software might not happen. Figure 6 shows an example of this type of hardware; this circuit illustrates how the tester (Figure 5) detects overcurrent faults . When requested by the control software, this circuit's power-up flip-flop is set, which switches on the power MOSFET Q2. The MAX472 current-sensing device senses the supply current drawn through the 0.5-ohm resistor (R4) and into the DUT. If the current through R4 exceeds 160mA, the voltage across resistor R11 activates one of U2's two comparators. If this overcurrent condition persists for more than approximately 30 millise conds, C1 charges sufficiently to trip U2's second comparator, which sets the overcurrent flip-flop. This condition disables Q2 immediately. The control software detects the overcurrent alarm and identifies the failed device, while the testing of the other devices continues. The control software must remove and then reassert the power-up signal before Q2 can again power on.
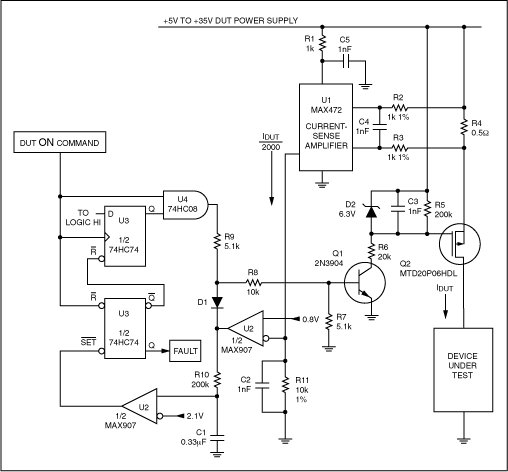
Figure 6. This circuit detects excessive current flow into the device under test, subsequently removes power from the device, and identifies the failed device to the tester's microprocessor via the fault signal.
Prior to laying out the board, it's helpful to prototype the various sections of circuitry and test them manually. Doing this ensures that these circuits function properly prior to placing them together with additional circuits on a single board and under the control of the IEEE-488 bus.
When considering board layout, it's important to examine the flow of the board's ground current. Board designers sometimes err by assuming that all ground-return paths stay at zero volts. Instead, current flow through the resistance of the ground traces creates unwanted voltage drops. Particularly troublesome are the transient switching currents from digital circuits that flow through the ground-return system. Figure 7 illustrates the errors introduced not only by the unspecified trace resistance of the ground path but also by the trace resistance of the power path. When ground- return current flows, it elevates VSS in accordance with Ohm's law (this voltage equals the ground-return current multiplied by the trace resistance). In addition, the power-supply trace suffers a voltage drop due to the DUT's load current. The op amp within Figure 7 detects these voltage losses and adjusts the power supply to compensate for them. Note that the sense leads must connect directly at the VDD and VS S pins of the DUT. Connecting leads in this manner is commonly called a "Kelvin connection."
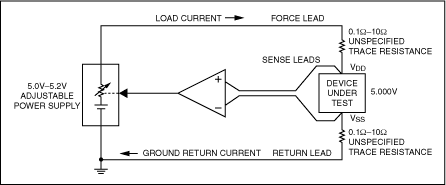
Figure 7. The Kelvin force-sense configuration ensures voltage accuracy and stability at the VCC and VSS terminals of the device under test.
Budget twice as much time for component placement as you think you need. Do a preliminary routing, perhaps with an autorouter, and look for congested areas, adjusting component placement to reduce the congestion. As mentioned previously, highlight all high-impedance signal lines, minimize their length, and keep them away from noisy signals. Prioritize the design constraints before starting the layout. Even the best layout designers cannot feed a 100mil trace into a 0.65mm fine-pitch lead.
Software DesignWhen controlling the instruments within a test setup, the commands that initiate this control need to be defined. Commands that control the parallel port send data in a "bit-banged" format. Both the RS-232 serial bus and the IEEE-488 bus transmit serial strings of character data.
The IEEE-488 standard governs the bus itself, not the kinds of messages sent over the bus. Despite this, there is some agreement as to what types of messages are sent. For example, modern DVMs use nearly identical command sets, saving customers development time. However, for older or nonstandard instruments, little or no agreement exists. The Standard Commands for Programmable Instruments (SCPI) is an attempt to increase the agreement within command sets. Look at the SCPI to see if any of its commands are suitable for your instrument, otherwise you will have to invent part or all of a command language unique to your instrument. Using SCPI is preferred, however, because it enables those who use the instrument to more quickly understand its operation.
It's best to develop software in small steps and in a logical progression. For example, when developing software for the signal-conditioner / pressure-sensor tester shown in Figure 5, its designer first developed the command processor, a collection of software routines that interprets text commands and controls the hardware accordingly. In its early stages, the command processor accepted commands only from the built-in RS-232 serial port of the tester's microprocessor. Once the designer of the tester built up the command processor using this port, he developed a number of low-level subroutines, using the command processor to test them. Gradually, he added device drivers for each of the subsystems (for example, the IEEE-488 controller, the A-to-D converter, and the digital I / O), always having known working code to fall back on if there were problems.
This modular approach to software design facilitates its initial development as well as future software changes, especially if the person creating the changes won't be the initial developer. After the tester was completed, a manager requested that it support the testing of an additional IC . The designer of the tester was able to support the new device in a matter of weeks, as he had organized the software into independent device drivers. Changes to one part of the software did not change other unrelated parts, because the designer aggressively partitioned the code, always anticipating future changes.
When debugging the software you have developed, you will find the RS-232 port is a handy diagnostic tool. In addition to its possible usefulness at the beginning of software development (as described above), you may also find it indispensable at the final phase of the project, while debugging the software. Even if the final design of the tester doesn't provide customer access to the RS-232 port, it can still function as an effective and inexpensive portal for status messages useful to a field technician.
When writing your software, reserve one memory location as a diagnostic enable and another as a diagnostic status indicator. Keep these memory locations in the final version of the software; should a customer encounter a problem, these diagnostic tools can provide valuable information.
A watchdog timer is a useful device, resetting the microprocessor if it gets stuck in an infinite loop. Software must service the watchdog timer at regular intervals to prevent its timer from expiring. When the watchdog timer expires, indicating that the microprocessor is stuck in an infinite loop, it resets the instrument's microprocessor, restoring it to a known operating state. The watchdog-timer reset can initiate the printing of the diagnostic status indicator contents, revealing which part of the software may be responsible for the crash.
Only the input, output, and delay subroutines need to service the watchdog, preventing its timer from expiring. As a general rule, the software spends most of its time in its input or output subroutines, so these subroutines are the best place to service the watchdog timer.
Perhaps this is obvious, but it is still worth saying: Make backup copies of the source code often. Each time you program a new ROM image, copy only the changed files to save time. Also, make sure you have a method for patching ROM code. Even with a limited amount of memory available for patches, the time saved for each instance you compose, compile, and test code is significant, particularly during marathon development sessions.
ConclusionA PC's parallel port provides a convenient connection between the PC and small, cost-sensitive applications. It is also a useful tool when prototyping a circuit quickly. An RS-232 serial port is typically employed in the same types of applications as the parallel port , but it often requires that a microprocessor be added. Potential problems accompany both parallel and serial ports, although most are usually minor.
The IEEE-488 bus can conveniently connect the PC to multiple test instruments. For the type of test system discussed here, this bus is the clear choice. Although it increases the price of the test system, the capability it offers for connecting more than one instrument at a time to the PC justifies the extra cost.
When designing the hardware for a test instrument, using the proper design technique from the beginning eliminates or minimizes difficult-to-solve problems that could occur as the design progresses. Separating digital and analog grounds, using optoisolators, identifying high-impedance nodes, spending time on component placement, accounting for voltage drops in power and ground traces, and other techniques all increase the chances of a successful design.
Developing the test instrument's software also mandates careful design. Write the software in small steps, making sure to partition the software so that future changes can be made readily. If possible, use SCPI commands when working with IEEE-488 buses. When debugging software, the PC's RS-232 serial port provides a convenient means of communicating with the tester's microprocessor. Keep memory locations used for diagnostic purposes available in the final version of the software, as customers and field technicians could benefit from them. In addition, use a watchdog timer, because these devices provide a convenient method for extricating a microprocessor from an infinite loop.
As soon as our company was established, the small size 4 Wire Resistive Touch Screen was first put into production,it range in size from about 2 inch to 22 inch,we provides a wide range of customization options to meet your requirements, including screen size, FPC outlet location, length, ITO glass thickness, LOGO and matte anti newton ring, bright surface treatment such as anti newton ring.we supply the best Resistive Touch Screen,commercial Touch Screen ,Glass touch screen, POS touch screen,GPS Touch Screen,Car touch screen,no drifting touch screen,stable touch screen,long life touch screen,high sensitive resistive touch screen,cheapest resistive touch screen.If you're interested 4 Wire Resistive Touchscreen ,we are your best choice.
Our 4 wire resistive touch screen picture show:


4 Wire Resistive Touch Screen
Monitor Touch Screen Panel,4 Wire Touch Screen Panel,Laptop Touch Screen,Usb Controller Touch Screen,4 Wire Resistive Touchscreen,Best Touch Screen
ShenZhen GreenTouch Technology Co.,Ltd , https://www.bbstouch.com